Thursday 25 September 2014

LOG LOADS FOR THE LOG FLATS

Having dealt with the log flats in the previous post, we take another look at the A-frame loader and the modeling of the logs.  Here is an elevated view.  As we have indicated, this loader would eventually be replaced by fork-lift trucks but it is the "state-of-the-art" technological marvel for my era.  It is also an interesting and unique model. 
As we mentioned before, there were two of these in existence in the Okanagan and Similkameen districts of BC.  One was owned and operated by Oliver Sawmills which, according to a newspaper report from 1955, had "seven active log spurs which supplied 60% of the mills log requirements, the balance coming in by trucks."  The mill processed ten to eleven million board feet of lumber annually.  The report continued, "After taking care of local building and shook requirements, the balance of the lumber is exported at the average rate of a car a day throughout the year." We know of spurs at Kettle Valley (Mi. 10.2), Princeton, Coalmont, Brookmere, and near Kingsvale on the Merritt sub (Mi. 54.9).

Penticton Sawmills owned and operated the other A-frame loader.  The sawmill was located in Penticton at the west end of the railway yard.  For much of the 40's, 50's and 60's, they had spurs at Myra, Princeton, Coalmont, Tulameen, Thalia (Mi. 99.6), and possibly others. 

Turning to the logs themselves we note that some logs were huge as can be seen in the following photo.  This log has been rolled up on two small logs and tied back with a chain.  The bark is very coarse and it would take a good while to count the rings on this one.
Here is a typical load from the late 50's.  The truck has just been loaded at the "Jammer" in the bush near to the actual logging site and seems to be ready to go although the left rear mud flap is in need of some attention.  For more logging truck photos we suggest again this most interesting link:  http://www.hankstruckpictures.com/hank_rabe_misc_bc.htm 
Here is a look at the load on our model truck showing the chains used to secure the load.  Lengths of wire are added to the ends which are easily inserted into the stakes of the log bunks.  The stakes are hollow brass tube to replicate the prototype's stakes made from steel pipe.  This allows the truck to be posed as loaded or unloaded for a little variety in the scenes.
The scale logs are made from branches of Lilac trees or bushes which look especially good in the larger scales.  The bark is amazingly realistic.  This is a case of nature imitating nature.  It is best to harvest them in the Fall when the sap is dried up and the newer growth - a green layer - does not show so much.  Other tree or bush sticks can be used for variety but they are not as good a Lilac.  Look to the photos above for diameters.  As to length, the sticks are cut to represent 16 foot logs which means that they are actually longer by a foot or two, so that the mill can get a finished 16+ foot length out of them or two 8 footers.  Longer lengths of logs were cut and shipped by rail into the sixties after the fork lifts arrived but the so-called "short logs" were still prevalent into the diesel era as evidenced by the photos we have mentioned in the previous post.  As progress ensued, logging trucks got bigger and more powerful.  Ironically, one retired truck logger said to me: "In our early days, we had small trucks and big logs; today we have the opposite, big trucks and small logs." 

Here is a selection of Lilac sticks before cutting to length and bundling up.
The brass gizmo in the background is a rack to assist with building a load.  It is the exact width of the flat car on the inside and is made of 3/32" brass square stock.  The logs are cut to length, placed in the rack and glued together with a generous amount of hot melt glue, running the bead on the inside (and out of sight of course).

Now a look at the finished bundles and their "wood" stakes.


The wood stakes are made from a piece of 3/32" aluminum rod (K&S) which is painted a tan colour.  This is sanded to a taper towards the top.  At the lower end we make a pointed end shaped to insert into the stake-pocket.  This permits removal of the load which is a benefit to the car forwarding system we use on the layout.  (All open loads on our freight cars are removable.)  Holes are drilled in the stakes and two small pins are inserted through each stake into the logs and glued.  You can just glimpse the whitish head of one or two of the pins that secure the stake to the logs.  The bottom of the load is identified with a sharpie pen: for example: "T - B" which stands for Tichy - B end.  I have also used wood stakes to simulate wood stakes but the aluminum ones are more robust.  It bears mentioning that these "wood" stakes are placed on one side only as the other side is placed against the log bunk's rail stake.


We conclude our posts on KV railway logging with a set of car numbers of the log flats we have been examining in the recent posts.
  • 306553
  • 306680
  • 307041
  • 307919
  • 308512
  • 308689
  • 336280
  • 336411
  • 336515
  • 336524
  • 336535 
These car numbers can be  found within the various groupings of flat cars listed in the table to the right.  All appear to have been built in the 1920's.  It would appear that individual cars were randomly selected from several specific series for conversion to log flats with the addition of permanent log bunks.  (This table is taken from a page in a book that the CPR issued every three years.  It was entitled SUMMARY OF EQUIPMENT and listed all the motive power and rolling stock of the railway.)


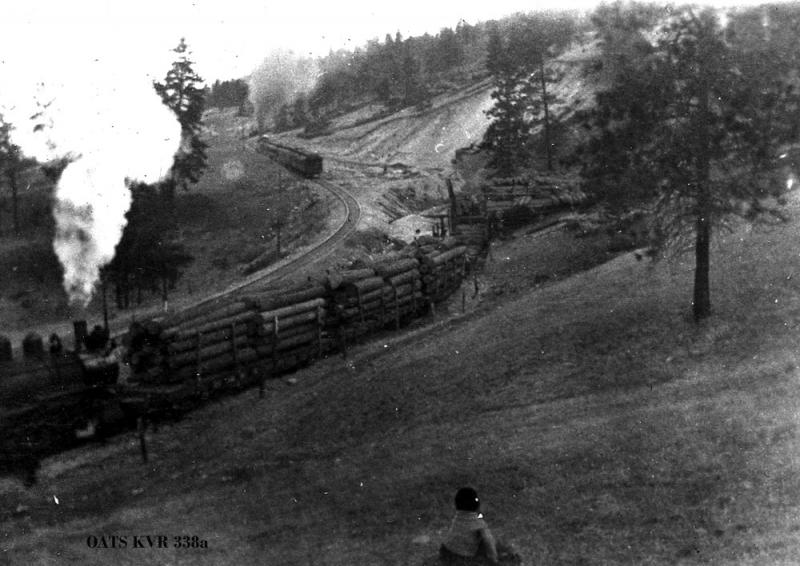
The car numbers show up repeatedly traveling from log landing to sawmill by way of the Penticton Track Scale, suggesting that the cars were captive to the Kettle Valley Division.  On a statistical note, we can report that in 1961, these cars carried 223 loads of logs over the Kettle Valley to the sawmills at Penticton and Oliver.  Most loads originated at Coalmont and Tulameen with a few loaded at Brookmere. 

 Happy Logging!

Coquihalla Man

Thursday 18 September 2014

KETTLE VALLEY LOG FLATS


We continue with our look at logging and the unique log flats of the Kettle Valley railway.  This post will be heavy on photos.  (One day I will acquire a better camera but for now we get by with 6 mega pixels.)  First a magnificent shot of a string of 13 or so log flats waiting to be lifted by the next Westbound way-freight.  Going by the topography, we believe this to be the spur at Mileage 10.2  of the Carmi Subdivision.  The A-frame can just be detected at the right of the photo which we saw in full view in the previous post.   Again we acknowledge the Oliver Museum and Archives for providing this valuable image for our modeling purposes - and to help preserve an interesting bit of history.  A few things of interest to note: the closeness of the loaded cars to the mainline; the height of the log stacks which are somewhat higher than the stakes; the pile of ties nearby; the derail and its sign; the large number of logs stockpiled.


Some of the books and publications on the market provide photos of train consists in which are seen cars laden with lumber, ties and logs in the consists of Kettle Valley trains.  This is what led me to search out the facts - just the facts, ma'm.  Here are some photo sources:

  • Barry Sanford, McCullough's Wonder, p.161 - lumber in bulkhead flats; chip cars
  • Joe Smuin, Canadian Pacific's Kettle Valley Railway, p. 22 - empty log flats
  • J. F. Garden, The Crow and the Kettle, pp. 263, 274, 276, 285, 299, etc.
  • Bill Linley, Canadian Pacific In Color, vol 2, Western Lines, pp.104, 105

In the shot below, taken in 1920, a Passenger train has just overtaken a locomotive working with a set of log cars which are in process of being loaded.  It appears that the logs are merely rolled and dumped directly onto each flat which presumably would add considerably to their wear and tear - not a desirable eventuality for the owner of the cars.  This also entailed the locomotive spending considerable time while the loggers did their work.  Photo courtesy of the Okanagan Archives Trust Society.
large photo


THE LOG FLATS are built from Tichy kits with some modifications.  Just as in the prototype, these log flats were rebuilt from ordinary flat cars of many different series.  Here is a photo of the kit with most of the extra details I use:
Missing from the photo are the extra weights that are added to the underside of the floor and the cut levers which are made from wire and eyebolts.  On the right beneath the decal package are the pieces used to build the bunks which are made from code 70 or 55 rail and 3/32" brass squares.  These are soldered together and blackened and "rusted up" a little.  The trucks are Accurail's Bettendorf with Intermountain's semi-scale wheelsets.  Wire grabs, wire staff, brass brake wheel and delrin stirrups last much longer than the kit's styrene originals.  I add the retainer valve to the car side as on the prototype.
The end result - with and without the removable load:
I built a few of these cars in days of budget constraints from Athearn flats whose side sills were trimmed off and the sub-frame modified.  As far as I know, no flat cars with fish-belly side frames were converted to log flats so the Red Caboose model would also need the side sills trimmed off.  But the better candidate is the Tichy (or Nor-West) model.  Here is the Athearn:
Note that his one has 11 stake-pockets, whereas the Tichy has 12.  I have seen photos of both.  There were also CPR flat cars with 13 stake-pockets which Nor-West models used to make.  Also note the lack of reporting mark (CP) and the split placement of the car number.  This is necessitated by the narrow space between the stake pockets which did not allow the full six-digit number as in the Tichy example and thus I ran out of space for the reporting mark.  Future models from the Tichy kit will have the appropriate two stake pockets per side separated a little more than usual to accommodate the six-digit number as it is difficult to squeeze them in.  In the case of both models, a recess accommodates the brake-wheel which is lowered during the loading process.  I do not know if the brake-wheels were raised by the brakeman for travel.

Finally, here are three photos that I took of a flat car sitting in the yard at Port Coquitlam many years ago.  Thirteen stake pockets.  Cars like these would have been candidates for conversion to log flats.


And a drawing of one with 12 stake pockets:

While the car in the drawing may appear at first glance to have fish belly side sills, in fact, the sides are straight and the fish belly is in the centre.  This is quite evident in the section views.  Note also that the pockets are unequally spaced.

Next week we hope to conclude our series on logging, log flats and the K V railway.

Coquihalla Man

Wednesday 10 September 2014

MILEAGE 99.6 LOG SPUR AND LANDING

One of my acquisitions years ago was an extensive yet incomplete set of TRACK PROFILES for the Princeton Subdivision through the generosity of a friend of a friend who knew someone...  I also had an incomplete set for the Coquihalla Sub from another source and then there were my own visits to the CPR Engineering Department that I mentioned a while ago.  These PROFILES are most valuable resources for the prototype modeler and I share a bit of one here.  (More to follow as occasion warrants.)  These are huge rolls measuring sometimes more than 20 feet in length by 12" or so high.  They are drawn at a scale of 400 feet to the inch horizontally and 20 feet to the inch vertically.  These different scales show the gradients better.  A mile is theoretically 13.2" long and a roll usually covers 12 to 20 miles.
 

Here is a section from one Princeton Sub roll that includes the log spur at Mileage 99.6.  (Normal map orientation with North to the top.)  Near the top is a straight line which is the plan or bird's-eye view of the
track with the switch and spur.  The little diamond and the P.S. indicates Point of Switch (aka Headblocks).


Otter Creek is shown as well with a bridge and its road opposite  "Farm Crossing".

The sloping dark line is the grade profile at this location which is 0.50  percent rising to the west.  The wiggly line is the actual ground contour at the centreline of the track as mother nature made it. This suggests that the track is built on a substantial fill.


The lower solid horizontal line indicates the track is tangent here.

 A few years ago, using Google Earth and detailed maps, I identified the location of this spur, the creek with bridge and other landmarks including the barn.  Then with a friend we visited the site, finding the bridge, some old switch ties and taking many photos.  This is an overall view, taken from the right-of-way which is part of the Trans-Canada Trail, looking East.  We are standing where the road crossed the track.  The switch to the landing was somewhat beyond the leaning tree trunk and would pass through the fence line on the right.  Close on the left in the bushes is Otter Creek.


I was very curious about the purpose of this spur.  "Penticton Sawmills" provided a clue but there was no actual sawmill here.  It turned out to be a landing for loading logs to be shipped by rail to Penticton Sawmills. Eventually, I met a gentleman who possessed an extensive knowledge of the area's economy having worked as a truck logger among other industrial occupations in the region.  This wide experience with very clear memories of his time in the bush are just what a modeler such as myself would need to construct accurate models.  He freely shared his memories and very specific details.  One day he took me into the hills to see the well-worn truck he used to drive.  Not long afterward he rescued the truck and began a major restoration which is well on its way to completion.  It is a 1952 GMC with custom log bunks seen here in her working days and in model version.  This is a Sylvan cab & mirror; Military truck wheels; Boler? chassis (extended).  Styrene bull-board and brass log bunks were scratch-built.  Load was made removable.


"So, how were the logs loaded?" I asked my new friend.  By an "A-frame" was the answer and for this he provided a description but there were no photos to be found.  As the saying goes, one picture is worth a thousand words and that was a truth I well knew as I began to think of how to build one.  Fortunately, a year later on holiday, I was able to visit the Museum and Archives at Oliver BC where I found the photo I needed. They graciously provided a copy and here it is.  The staff there were enormously helpful in providing information and photos.  http://www.oliverheritage.ca/home  I do not know who took the photo but we believe it to be the spur at mileage 10.2 of the Carmi Sub. 

Loading operation.  The A-frame was portable and moved itself along the string of flatcars by a cable from the drum which was run out to the last car in the rear.  This cable is just visible.  After all cars were loaded, it sat on the last flat car in the string while the way-freight engine pulled them out - 10 or so log flats.  The loads were cut into the train except for the one with the A-frame which was placed on the head of the string of empties being switched back into the spur - in this case on the left.  After the train had left, the loading crew moved the A-frame into position so it could load the first half of the first log flat.  It bridged two flats as seen above and below.  Two or more skids were placed into position at the side of the flat car and the first logs dragged up the skids onto the log bunk.  After the load of logs was about half-way high, a wood stake was inserted into the stake pocket and tied to the permanent steel stake on the other side of the car.  In later years, chains with a ring were permanently fixed to the steel stakes and the rings looped over the wood stakes.  More logs were then loaded onto the pile to the required height pressing down on the wire or chain, drawing the stakes tight and secure.  The A-frame was then moved half a car-length rearward in order to load the second bunk.

From this photo and the verbal descriptions, I was able to construct a reasonable model of it by scaling and imagineering. Our rigging is little uncertain but otherwise it is a good guess - good enough for me.  Here we see our friend in the '52 GMC has finished dumping his logs and reset his stakes.  The crew has started to load the first bunk of the log flat.  Soon they will have to drive their wood stakes into the stake pockets and set up the wire ties.  The A-frame is seen bridging the two flats with loads to the front and empties to the rear.


Turning back to the prototype, we note that there were two A-frames in existence through the 40's and 50's being quite similar in construction.  One worked for Penticton Sawmills and the other one (as above) for Oliver Sawmills.  It was a labour-intensive process as can be seen from the fact that there are five men in the prototype picture: two manning the tag lines, one with cant hook at the end of the car, one running the gas-powered engine and drums and one tying his boots!  There were numerous log spurs on the Princeton Sub in particular, but Carmi and Merritt as well.  These log loaders would travel to where the logs were piling up and their respective crews would travel with it to do the loading.  The A-frame itself and the boom were lowered into position on the skids and metal bars and then secured for travel on the flat car. Sometime in the late 50's or early 60's, the efficiency of the new-fangled fork-lifts put these A-frames out of work.

For further information and photos of the prototype logging industry try here: http://www.hankstruckpictures.com/hank_rabe_misc_bc.ht
Here is an interesting story of 50's logging posted by the the same source: http://www.hankstruckpictures.com/hank_rabe_lind_trucking.html

This post is unusually long so we will continue our presentation on this most interesting operation next week with some additional information on the models and the prototype.  Timberrrrrr!

Coquihalla Man