
The second enginehouse in Brookmere was destroyed in March of 1949. The
CPR decided to rebuild it fairly promptly and the plans show a date of
July 11, 1949. This post will treat of the model constructed from the CPR drawings and some field measurements of the foundation which were taken about 1986.
First we will supply some additional information to supplement the preceding post in the interests of aiding modelers to construct miniatures of this fairly plain but still interesting four-stall wood-frame enginehouse. There has been a significant delay in composing this post and this is due largely devoting hobby time to bringing our model to completion. Well, "completion" except for the doors which are "back ordered". The Stanley Cup Playoffs have been something of a distraction as well.
Here is a view of the actual Brookmere roundhouse foundation. The engine pits and other bays have all been filled in with gravel. The pit stalls still retain their rails which were bolted to the concrete using 1 1/2" nuts and 3" washers spaced 12" apart on each side of the rail. The two outside bays were fitted with standard ties and rail when the enginehouse was in service.
This next photo shows the turntable pit and enginehouse foundation as built in full scale for our Brookmere shop area. Basic dimensions are provided from field measurements. These can be compared with the dimensions on page 1 of the 90 footer plans published in the post of March 28. It appears that most major dimensions of the 90 footer are common to the 100 footer except for three critical items: the length (naturally); the width of the rear walls; the distance from edge of turntable pit to front wall. The site measurement of this last item is about a foot longer than what the plan of the 90 footer calls for.

In laying out the foundation for the enginehouse, one important consideration should be the relation between the three dimensions mentioned above. Any change in one will affect the other two. One non-variable will be the width of the front walls, each of which is made up of a pair of doors 6'- 6" each and part of two 12" posts. This overall dimension is 14'- 0" for each front wall. Another non-variable is the location of the house tracks. Where they converge at the edge of the pit, there must be some distance between adjacent rails to forestall the possibility of a short circuit.
Note in the photo and in the page 1 plan, that all lines of track centres, walls and partitions (i e, line of post piers) between stalls converge on the centre point of the turntable. The front and rear walls are constructed at right angles to the track centrelines.
This view shows the interior framing of the house and the colours that were based on the coloured photos by Glenn Lawrence, copies of which were provided in the previous post. The interior blue is a custom blend of Floquil paint, the formula of which has gone from our memory. This is intentionally a bit lighter than the
exterior wall colour. As on the prototype, the interior is quite dark when the roof is in place. Since the prototype and the model will not have the luxury of electric light, it was thought that giving the walls a lighter shade would help the detail be seen better by the full scale viewers. We are thinking of setting up a few tiny "kerosene lamps" (using the nano LED's) amongst the stalls to represent the illumination of the period.
The paint used for the upper walls and roof timbers is Floquil Antique
White. One of the walls is masked up for painting. It takes a few
hours to get the masking right as the tape must be fitted so closely
around each of the studs to prevent over-spray of the dark blue to work
its way into where it should not be. The painting itself is done in a matter
of minutes but the finish is infinitely better than painting by hand
with a brush.
The colour chosen for the foundation and floor is Floquil Concrete. The length of the engine pits is based on the site measurements. They are 6' - 2" in from the front of the foundation and extend to the end of the track. The foundation and floor is made entirely of Evergreen Styrene. The manufacturer of the piers is unknown but they match the field measurements and are simply glued on top of the floor. As will be described below, tapered holes were drilled and rasped out after setting in place. They were carefully laid out with dividers to get them accurately placed. The hoods of the smoke jacks can be seen on the underside of the roof.


These two shots show the lowering of the house into position with the pins
"entered" into the sockets in the concrete. Getting the pins to enter
takes a bit of patience but by going slowly and working from the rear to
the front, it takes only a minute or two to get them all in and the house
settled. The time taken to make the building demountable is well worth it since the track is accessible for maintenance purposes and for further detailing. The engine pits meed stairs and bolts for the rails. The workbenches, tools, jacks and supplies associated with locomotive maintenance will also be added to give the house a lived in appearance, but for now we are just glad to have the structure proper completed.

Each of the piers has a hole to receive the pin of the post and this hole is tapered so that it is wide at the top and narrow at the bottom. This facilitates the pins entering easily and then as they progress down the hole to the narrow end, the posts are pulled to the centre of the pier. The pins are centred on the post. The holes in the foundation wall are also tapered. The taper is cut with a Dremel tapered rotary rasp after drilling a pilot hole on the centre of the pier. Having an opening in the roof is helpful for tweaking the posts' pins into position over their respective holes. It also provides an interesting view of the interior that is hardly visible from any other angle.
A shot of the enginehouse from the rear, showing the smoke jacks and ventilators. The colour of the jacks and ventilators is based on their appearance in the 1968 Glenn Lawrence shot. At that point they had endured 19 years of weathering, so what they looked like when new, is uncertain. The specifications detail a fire retardant paint but colour is not specified. The removable roof section is obvious from this angle and a solution to the protrusion must be found. Perhaps weighting the section will do it.

The roof was constructed of 0.030" styrene sheet bonded to the Purlins and walls. To it was glued a layer of garnet sandpaper to represent the tar and gravel of the plan specifications. No photos reveal the real roof and its colour. The sandpaper is 120 grit and its texture is a fairly convincing H O scale gravel when painted with Floquil paint: S.P. Lettering Gray. Of course, gravel comes in whatever colour local pits supply and this is our decision after trying several different colours. The fascia boards are 2" x 8" styrene and were painted before application.
Here is a drawing that is difficult to read of one more detail but could be helpful. The overall dimensions are "about" 3'- 0" x 3'- 2". The base is "about" 1'- 9" x 1'- 11 1/2". Estimated height is 2'-8" above a flat roof.
One significant challenge was to find a suitable colour for the exterior
of the enginehouse to approximate what appears in the Glenn Lawrence
photos. It is unmistakeable that there is a blue tint to the CPR
"gray". There were many attempts with different manufacturers'
products including custom mixing, but our final answer is Tamiya paint:
Sea Blue, XF-17.
This brings up an interesting dilemma for us regarding weathering and
ground cover. By our target date of September 1949, the building may well have been still undergoing finishing touches so, strictly speaking, weathering would not be appropriate.
But it seems so unusual by today's standards of model
railroading to leave the roundhouse in pristine condition. Just how much should we show as evidence of the iron horses inhabiting their stable? We are inclined to ignore the historical constraint and do a little weathering but until we do decide, your comments are invited.
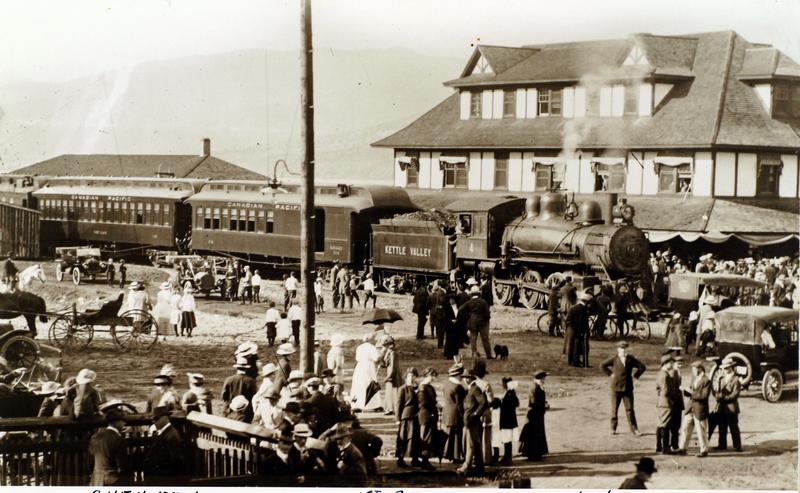 One hundred years ago on May 30, 1915, the first passenger train arrived in Penticton to much fanfare. This was the first of many trains to run on the Kettle Valley Railway which had a most important hand in developing the interior of British Columbia. Sadly as we all know the railway did not last forever but there continues an abiding interest in all things KV.


