Saturday, 28 March 2015

BROOKMERE ROUNDHOUSES, I & II


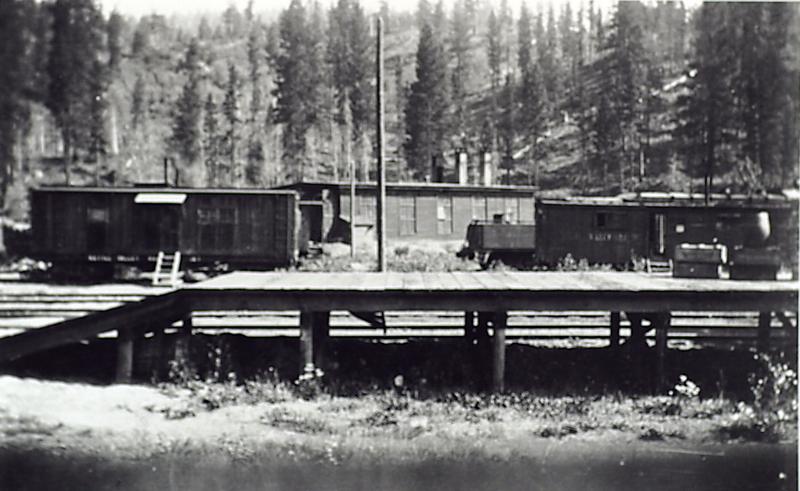
There were three different "roundhouses" erected in Brookmere over the years.  We will describe them a little with a view to helping model railroaders construct miniatures of these gems.  The first of these was a three stall rectangular structure that of course was not really a roundhouse.  Actually, the CPR term in all cases was "enginehouse" but we will use the terms interchangeably here in our posts.  This first one was built fairly soon after the KVR established itself there in 1916 according to Joe Smuin's Kettle Valley Railway Mileboards.  Here is a close up of the enginehouse from a photo published previously in the post for December 12, 2014.


From the same post, here is a close up of the station ground plan.  Note that there are engine tracks either side of the enginehouse itself.  These changed somewhat over the years according to local needs.  Sometime in diesel days, they were removed.  There is a cinder pit thirty feet long on the north engine lead and a depressed track for loading the cinders into gondolas.  The bunkhouse to the east was an old car body assigned to house the watchmen and wipers.  Somewhat less than a one star hotel.  The engineman's bunkhouse was hardly better though it had a water supply and a telephone.  At least they had a privy unlike the watchmen on the lower end of the scale. There are some dimensions given on the plan and the turntable is 70 feet long.  From these the size of the enginehouse could be reasonably estimated.  Note the telephone wires that run to the building from a junction near the Station.  At some point, an office for the locomotive foremen was fitted into the rear of the station.  Later on the foreman's office was moved to the new bunkhouse which was built in 1945.

Here is another shot provided by the Okanagan Archive Trust Society also published previously in the same post.  This shows the side of the enginehouse with the tall windows and tall smoke stacks.

large photo
There are several photos in KV books which show the front of the enginehouse, notably Robert Turner's Steam on the Kettle, p. 60 (uppermost photo), and p. 58.  The photo caption erroneously identifies this enginehouse as the one destroyed in the explosion in 1949.  Another photo is to be found in Hal Riegger's The Kettle Valley and it's Railways, p. 215.  The front of the enginehouse seems to be identical to the one at Hope which is shown below in another shot from the Okanagan Archive Trust Society.  The locomotives appear to be of the D-9 class which were 4-6-0's, numbered 560 to 597 and were often used in passenger service in the 1920's.
large photo
The original Brookmere enginehouse was dismantled and a four stall house was built in 1944.  The date on the drawings is 1936/7 but because of complications arising from the joint track arrangement with the GNR, construction was not undertaken until 1944 according to Joe Smuin's very reliable sources.  One of these sources supplied a very helpful photo of the enginehouse and attests to its date of birth.  The first recognition feature of this second Enginehouse is the placement of the window in  the side wall close to the front doors.  Otherwise, this house does not look much different than the one that replaced it in 1949.  Compare this photo with with the similar image in the following post on BROOKMERE ROUNDHOUSE III.


The building was 90 feet long and each of the four rear walls was 27 feet wide.  The front walls were 26 feet high and the rear walls were 19 feet high.  In the upper part of the first drawing are seen the posts and girders that were erected between the stalls.  Note the size and spacing of the "purlins" (roof joists).  The size increases as the span increases from front to rear while the spacing decreases.  To the purlins were affixed a roof of 2" x 3" 's on edge.  These members were nailed hard to each other so that the roof was solid wood, 3" thick. It should be noted that solid wood is actually an effective fire resistant component; i e, it takes fire a long time to burn through.  This was a common practice in construction of the time.  Even up to the 1960's, fire walls in wood-frame apartment buildings were constructed in the same manner, but usually of  2" x 4" 's and sometimes 2" x 6" 's.  The roof membrane is specified as Tar and Gravel although we cannot confirm its actual use.  In the lower part of this first page, the faint outline of the original enginehouse from 1916 can be discerned. 
Page 2 is the plan view.  The building's walls were constructed of 3" x 8" plates and studs on 24" centres.  There were two engine pits that were concrete-lined.  Otherwise the floor was made of cinders.  Only the tops of the piers for the posts would show.  Purlins are set at right angles to the centre lines of the tracks on top of the main Girders which were 12" x 16".  Many of the construction details will be made clearer in the next post with photos of the third enginehouse.   
This third sheet shows the outside wall (called "end wall" on the drawing) with internal framing that is similar to the posts and bracing shown in the first sheet.  Many windows are provided for as there was no electric light available.  Wall sections and details are also provided. The wall studs would be exposed as there would be no internal wall finish.  No insulation other than two layers of building paper between the ship-lap and the 6" drop siding (a k a novelty siding).  Heating would be provided by whatever locomotives had a fire going.  Oh, how we don't miss the good old days!  Can you imagine working on the iron horses with large steel wrenches and other heat-drawing tools in your hands in sub zero weather - even with gloves on?
Here is a drawing of a smoke jack that predated the one shown in page 1.  It differs principally in not having tapered sides but this drawing is included here to help with dimensions and to illustrate the methods of construction and installation.  This item would be built up of solid 2" x 2" lumber in the various sections shown on the right side of the drawing.


Our final drawing is from another source and shows all the detail for "standard" enginehouse doors. It is dated 1945 and would probably be correct for this enginehouse.  Placement of the "wicket door" (man-door) might vary with the local situation.  The glazed door was not an option to be found on the Brookmere roundhouse.

This is the roundhouse that was destroyed in the boiler explosion in March, 1949.  A distant shot of it can be seen in Turner's book on page 60, the middle photo.  There is a photo of the damaged roundhouse in Joe Smuin's other book, Canadian Pacific's Kettle Valley Railway, published by BRMNA, p. 28.  On page 29 is seen the third enginehouse.

Next week we will continue with a drawing and photos of the third roundhouse for Brookmere.  It is similar in many of the details to the one presented here although slightly longer at 100 feet.  And perhaps our model will be ready for presentation.  We have been busy with building it and then a trip to the Bayrails Operations meet in San Francisco.  So, we have been a little short on time for the blog.

Coquihalla Man

Tuesday, 10 March 2015

CPR HALF DECK TURNTABLE IN HO

A working locomotive turntable is always interesting and appealing.  We are happy to say that ours is finally in working order after years of manual semi-operation.  It was built so long ago that some of the details of its construction may be lost in the mists of time, but the main points will be addressed here.  The particular method of construction is a little out of the ordinary, a wood lathe being the major tool used to achieve accuracy.  Care was taken to align the pit hole, the seat for the centre bearing and the turntable shaft. 

Pit Construction:  The model pit was built of 6 segments of white oak, glued up with splines or woodworking "biscuits" between the segments.  It was turned on a wood lathe and a clearance hole bored for the shaft.  A seat for the ball bearing was cut into the underside of the pit.  The wood has remained very stable for about 30 years.  In the photo you can see the joints of the segments near the centre hole.  In shaping the pit, we worked off dimensions which we had taken in the field at the site of the former Brookmere railyard.  The owners of the property at the time were nicely accommodating and made the roundhouse area accessible.  Note the coping timbers under the rails on the perimeter of the pit.  These are detailed in the prototype drawing presented in the previous post.

Pit Rail and Wiring:  During the turning process, a recess for the pit rail was cut into the appropriate place which made fitting the rail in place quite straightforward.  After installing the completed pit into the layout, gaps were cut in the pit rail for isolating the two halves of the rail due to their opposing polarity.  This is called a split ring pick-up and is sufficient for d.c. systems.  With DCC it was found necessary to cut a second pair of gaps to completely isolate the bridge pick-ups for a second or two during rotation.  DCC rails are always hot.  The minor drawback with the split ring system is that sound and light are turned off for a second as the bridge is momentarily isolated on the dead section of the pit rail.  We can live with that.  A more complicated system of wiring the bridge is to use the pit ring for one wire and a centre shaft take off for the other.  This method works fine with d.c.train control systems but for DCC it is necessary to wire in a reversing circuit breaker. 

Bridge Base:  Here is the underside of the bridge showing the wood base, electrical pick ups, shaft and mounting plate.  The wood base for the bridge was also turned on the lathe as a disc and a 3/8" hole bored through and true.  When demounted from the lathe's face plate, it was sawn to width with the 3/8" shaft hole kept on centre.  A piece of aluminum plate (1/8") was prepared for the base, a centre hole bored and screw holes bored for mounting to the wood base.   During mounting, the centre holes in the mounting plate and the one in the wood base were carefully aligned to keep the assembly centred.  The brass shim (.002") under the aluminum mounting plate was necessary for final truing up of the table to the pit and engine leads.
Turntable Shaft: As mentioned, a recess for a ball bearing had been cut into the dead centre of the pit on the underside while being turned.  The bearing was trued up and glued in place with Urethane Glue.  The bearing takes a 3/8" shaft made of cold rolled steel.  The shaft does not actually touch the hole seen in the pit photo, passing clear through to the bearing located in the bottom of the pit.  The top end of the shaft had a shoulder cut into it for fitting hard to the aluminum mounting plate.  This was done on a metal lathe by my friend Mike, a MMR.  He also drilled and tapped the top end for a machine screw and fabricated a solid washer.  A "flat" was filed on the bottom of the shaft to take a set screw.  This set screw is part of the coupling for the drive system that we will reference below.

Bridge Wiring:  In the photo above, can be seen the brass stock glued to the wood base.  Pick-up shoes (by Tomar) are soldered to this brass stock and two wires run to the appropriate Bridge rails.

Bridge Deck: The ties and timbers were applied to the wood base according to the specifications in the prototype plans (see previous post).  The walkway planks have a removable middle section for access to the machine screw and washer for future maintenance purposes.  Rails were laid and wires soldered to them.  Care was taken to install the rails in exact position relative to the centre point of the shaft and the centre line of the table.  Each of the approach tracks were then laid so that both ends of the table track were able to line up with it.  Some minor adjustment was required with each approach track and as well as the bridge rails till every rail lined up every time.

Bridge Girders are resin castings from masters made by friend, Brian Pate of Klondike Mines Railway fame. http://www3.telus.net/KMR/  He has two of the 70 footers on the CPR portion of his layout at Sicamous and Arrowhead.  Thank you Brian.  Nicely done and much appreciated.


One detail still to be modeled is the hoses that were connected to the piping to supply air to the motor from a locomotive.  This is seen in the Lawrence photo from1954.  There are a few other minor additional details that could yet be added to the bridge and pit.

Model Bridge Motor: From the prototype photos and the one appearing in the Hal Riegger book, the various dimensions for the model were calculated starting with the wheel and sprockets.  The toothed sprocket was reckoned to be 33" in diameter as was the sprocket paired up with the drive wheel.  Two wheels from the Walthers' Old Time Coal Conveyor were used for the sprockets, cutting out half of the spokes: (Walthers Part # 933-3520).  Glued to a Tichy plastic 33" wheelset as the drive wheel, it was a good match to the prototype. Judge for yourself.  The model drive wheel is suspended above the pit rail so that it does not touch it.  The brass rods simulating the prototype braces were enough to hold the motor rigidly.  When in motion, the external sprocket does not rotate as the prototype did but if one of the readers figures out a way to do it we would be most interested to hear about it.


Turntable Drive:  Initially, this model was a "finger-strong" turntable.  Now it has a wonderful drive system made by New York Railway Supply: http://www.nyrs.com/  It works perfectly but for quite a while it did not.  This was due to a technical inexactitude by, yours truly, the builder and blogger.  Now corrected, the turntable does what it is supposed to do.

Control panel:  Using components from New York Railway Supply, a custom panel was fabricated.  The pointer of the rotary switch simply indicates which of the 7 tracks the crew wants the Turntable to line up with.  It does not power the track.  The toggle switch indicates which end of the Bridge will line up with the chosen track.  The 5 engine storage tracks have gaps cut in one of the rails to allow the engines to be isolated from the electrical power when not in use.  Pressing one of the momentary-on push buttons will power the appropriate track, thereby passing current to the locomotive to enable it to exit the house under command of the engineman.

One interesting note: Happily, our model Bridge lines up with both the engine house track #2 and the main engine lead regardless of which track the head is oriented to.  A long time CPR shop man told us that the actual Brookmere Bridge would only line up with both tracks in one orientation!  Rotating it 180 degrees would result in the bridge rails lining up at one end only.  So, if your bridge has this problem there is a precedent for it.


Some days we just have to watch the engines taking a spin on the turntable.  Great stuff.

Coquihalla Man

Thursday, 5 March 2015

CPR 70' HALF DECK TURNTABLE

Having received a few questions and comments about our latest project, the Turntable and Roundhouse in Brookmere, we will give a detailed response here and publish plans and photos of the prototype and some details on our miniature interpretation of same.

In operating a model railroad, it becomes quickly evident why the prototype built these items because a method of turning steam locomotives is a vital necessity.  The two most common methods for turning engines were the Turntable and the Wye.  Sometimes a loop track was built and employed, an example of the latter being the loop at Princeton but these took up a lot of real estate so were rarely the preferred option.  Incidentally, larger KV locomotives were restricted in their use of the loop track in Princeton which was a very tight 15 degrees of curvature.

It is evident that the 70 FT HALF DECK TURNTABLE was a fairly standard type for the CPR. The seventy footer was to be found at several locations along the southern mainline according to photographic evidence and documents in our collection.  At least one is still in existence today in Victoria BC.  On the southern mainline there were possibly ten located between Medicine Hat and Odlum.  On the Kettle Valley Division, 70 foot Turntables were located at Brookmere, Allenby and Copper Mountain.  This size was adequate for most steamers at the time of installation in the early part of the 20th century.  But the P-1n class locomotives with the larger tenders coming on stream in the late 40's, were too long to be turned on them.  This became a moot point as the larger engines generally were run between the major terminals which were equipped with larger tables.  Shortly afterward, dieselization took place and the need for this device diminished.

The focus of our study today is the 70 foot turntable at Brookmere which served the railway well from 1915 until the passing of the steam locomotives.  Here is a shot by my friend, the late Glenn Lawrence taken in 1954, shortly after dieselization.  [Update:  This is a clearer picture that has come my way from a mutual friend of Glenn's]


A few details to note here.  The exterior engine storage track to the north of the engine-house has been removed but only recently.   This track shows on the drawing from 1953 and in a photo from 1952.  This is the only shot we have showing the drive motor from this, the exterior side.  More about this later.  The overhead piping to supply the air for the drive motor is cut off by the photo edge.  The piping ran over to the pump house.  Before the erection of the pump house at the time of the Bunker "C" Oil facilities, the table was powered by means of the engine air supply which was fed through the hoses seen on the deck in the foreground.  Hoses were also fitted at the other end, hence the pipe that runs the length of the turntable.  Part of this pipe was removed sometime later as it does not appear in the Lawrence photo published in a previous post and herewith presented again. 

 The pole to the right (or east) of the pit in both photos has a cable running to another pole on the opposite side of the pit.  This cable supports the air line which, as we said, was run to the pump house.  I suspect it ran down the post and went underground from there.  The drive motor appears in a photo from 1944 but of its existence earlier than that we cannot say.
 

Here is a Lawrence photo taken on the 1968 trip.  Extraneous marks appear in the original. Unfortunately, there do not appear to be measurements or drawings of it.  Hal Riegger published a good photo of it on page 216 of his book, The Kettle Valley and its Railways.  The Victoria turntable drive motor is quite different.


This photo is a recent acquisition and was taken by a fellow KVR modeler when it was lying discarded in the pit many years ago.  Apparently it has disappeared since.  At some point - probably 1970 or so - the bridge was cut up for scrap, leaving the pedestal and the centre core of the bridge which still sits there to this day (on private property).  As can be seen, there is a great deal of gear reduction designed into the drive mechanism.  The interior sprocket is paired up with the drive wheel the flange of which is seen projecting slightly past the teeth.  The bracket seen on the left was bolted to the girder side of the Turntable.

Another shot which may be of interest to the modeler, is this one of a section of the turntable pit taken in the 1980's.  
The gap in the upper concrete rim is the opening for the "coping timbers" on which the rails were placed.  They functioned as cross ties in stead of the rails sitting directly on the concrete.  The rails in this location were the turntable leads on the west end of the pit.  It would seem that the pit rail was shimmed with the many wood wedges pictured to get it true to the table and the drive wheel.  The vertical lines on the inner wall are rust stains caused by rain water running off the gullies in the horizontal part of the pit wall.


Here is another shot by Glenn Lawrence showing detail of the bridge deck which is useful for modeling purposes.  The exposure has been lightened up to better provide detail.  Note the pole to the right (or west) in the photo which supports the air pipe previously mentioned.


Another photo of interest is one to be found in J. F. Garden's book, The Crow and the Kettle.  On page 37 is shot of a C-Liner posed on the turntable at Crowsnest.  The rails of the table are higher than those of the leads and this was standard practice.  Refer to the drawing below which specifies a 1" difference.  The need for this was seen in a movie of a CNR locomotive edging on to a turntable with the result that the table very definitely sagged under the weight of the locomotive as the Drivers contacted the bridge rails.  This would not be a design feature for model builders to adopt.

Finally, we present a CPR drawing of the turntable and pit with all the detail necessary to build one in scale or full size even!

The drawing was made by a gentleman, initials "MG" who published various other drawings in the 1985.  I bought a set when first released and have not heard of him since.  Efforts to trace him or his company, Mainline Design Group, have been fruitless.  I truly hope that he is agreeable to my publishing this rendition of his drawing.  This is a not-for-profit Blog site and our motivation is to further the hobby and help modelers with accurate information for their building purposes.  I have no interest in collecting stuff, just to "have it".  Or in making money off a hobby.  The original was drawn up 100 years ago and I doubt that a copy of an original falls within copyright laws since it is in fact, a copy - albeit, a beautifully rendered one.

For some additional photos of another CPR 70 foot turntable check out the one that was located in Goderich Ontario: http://www.trainweb.org/oldtimetrains/CPR_London/goderich_turntable.htm

Next post will be a description of how we built a model of the Brookmere Turntable.

Coquihalla Man

Monday, 23 February 2015

WORKING BROOKMERE YARD PART 2

Today you are called for an Extra East out of Brookmere.  The Agent has handed you the consist in the form of car cards and waybills.  In a sense this is a "Switch List" or "Train List" when grouped together in order with AAR car type, load, shipper and consignee.  You note that all but one of the waybills have the blue stripe with the text: "Penticton and East" across the top. Thus, there will not be any on-line switching to do on your run today.  The one waybill without the blue stripe is an idler flat for the overhanging load which of course will stay with the Gondola load of poles to its final destination.  A straight shot to Penticton.  You note the maximum consist is 16 cars including caboose, so your 13 cars is well within the limit. You scan the "Train Card" instructions which give a brief outline of the important things that need doing before you are ready to go.  Next, over to the Roundhouse.

The locomotive foreman has assigned Engine 3628 and you are pleased to have her 'cause she's a good steamer with a power reverse. This makes switching a lot easier.  You ease your iron horse out of the roundhouse and onto the Turntable.  You do not have to turn her today, just a short move for the 'table to the vacant engine lead, then back up through all the switches to get her over to the run-through track, which is Yard Track #1.

Trundling down the track and approaching the station, the fireman rings the bell until clear of the platform.  For the rest of your switching moves in the yard, the bell is not necessary.


Backing into the Caboose track, you couple on to your conductor's early "mobile home" which is conveniently the first in line.  We try not to disturb the slumber of the occupants of the other "cabeese" or did you hear about yet another game of cards in which an unknown quantity of lucre is most probably changing hands.


You set out your caboose on Yard Track #1, then reach into Track #2 for the cars on your switch list.  Looks like you are taking everything that is going east to Penticton.


Pulling them clear of the switch, your brakeman gives you the sign for backing them onto the caboose.


You push them well into the yard track.  The caboose is almost opposite the station which is convenient for the Conductor who has been inside, talking to the Operator. 


Following the information on the waybills, two more cars are retrieved from Yard Track #3 for the train.  That should do it for the switching.  Time to pump up the air, walk down to the station to meet the Conductor, check your watches and go over the Train Orders.


Only one Order today which is a combined "Runner" and a Meet Order on No. 91.  The Dispatcher is making your life easy today by fixing a meet with the opposing Westbound.  Could be she is running late or switching in Princeton.  No need to choose where to duck into a siding for No. 91 but you would not want to delay her.  Time to go.


Two longs on the whistle and bell ringing, you slowly pull out of Brookmere, stopping or at most crawling into the clear of the Yard Lead switch to let the Brakie back on.  Remember to re-line that switch back to "Normal".


The caboose rolls by.


This has been a morning in the yard at Brookmere for an Extra East on the Kettle Valley line in September of 1949.  This is a simple run for clarity and conciseness in illustrating procedures in Brookmere yard for train crews attending our operating sessions.  Recently, construction work in the yard has produced a detailed and working Locomotive Turntable which is evident in a photo in this post.  It was a great deal of work and thus delayed the writing of this post.

Coquihalla Man

Monday, 9 February 2015

WORKING BROOKMERE YARD: PART 1


Today we consider part of the operating procedures for Brookmere yard as it was worked in later steam days.  This is what we try to replicate in our operating sessions every month or two and we are pleased to report that a good time is usually had by all.  The description that follows is in part information for the crews who attend our sessions on Saturday afternoons - especially those new to the layout.  Today we will examine the movements for a freight train arriving at Brookmere from Penticton.  We are guided in this by information supplied by several KV veterans over the years, gleaned in particular from the conversations surrounding the display of the layout at the annual reunions about which we have written in the previous post.

Our photograph shows a train headed by Engine 3639, arriving in Brookmere with 7 cars in tow - a shorter train than normal for brevity and clarity in our illustration.  It is Fourth Class train No. 93 with its schedule highlighted in our Timetable reproduced below. 


In prototype terms she has 3 loads and 4 empties - the caboose always figuring in the car count as an empty.  This car count would have been supplied to the Dispatcher by the Conductor through the Penticton Operator which is the Initial Station for this train.  She is taking the main track, arriving at Brookmere in the early afternoon. As a scheduled fourth class train, even though she has right, she approaches at Yard Speed in anticipation that the main track may be occupied by another train or engine.  These latter are permitted to occupy the main without protection within Yard Limits (see Rule 93).  By the way, YARD SPEED is defined as "A speed that will permit stopping within one-half the range of vision."

In the case of our No. 93, the crew needs to know what to do with the cars in our train because the cars are going somewhere.  In order for these cars to be expedited to their intended destinations, they will be set out on the appropriate tracks in Brookmere yard. Those intended destinations are stipulated in the Waybills that accompany every freight car on a railroad.  For the model layout, we use a set of Waybills that is fairly standard for operating layouts.  They are accompanied by "car cards" that are somewhat of a substitute for a switch list.  We are considering developing a more prototypical looking set of Waybills and even a Switch List.  See Thompson's many posts one of which is here: http://modelingthesp.blogspot.ca/2014/09/waybills-part-34-one-piece-waybill.html

Here is the set of (model) Waybills (attached to Car Cards) for the train under consideration.  On the top right is the Locomotive Card with a brief description of its work and how to do it written on a Train Card.  In this case the back page of the Train Card specifies that No. 93 arrives in Brookmere on the main track and will spot its caboose on the [Princeton Sub] Caboose Track East and then yard the rest of the train.  On the top left is the Car Card and Waybill for a Pacific Fruit Express Refrigerator Car, PFE No. 62265.  The colour of the heading and text reflects the actual colour of the model car and its lettering, in this case an Orange car with black lettering. This feature is very handy for setting up consists before operating sessions and finding particular cars.  It is also meant to help our train crews.


The red stripe and text on the waybill states that the car is headed for California via the interchange at Huntington BC.  It is an empty (MTY).  In the pressure of the operating session, the red stripe is a quick and convenient way to establish where a car must be spotted in the yard.  In this case it is going to the Westbound through freight track along with 3 other cars (which also have red stripes on the waybills).  Two empty log flats have no stripe which means that they are "shorts" bound for a local shipper/receiver on the modeled part of the layout.  In this case they are destined for the log spur at Thalia.  On the prototype, the conductor would have a complete set of waybills in his caboose.  From the waybills, the conductor or a yard clerk in his originating terminal would make up a Switch List or Train List with every car entered on it with a few details about lading, consignee, shipper, weight and possibly special handling instructions.

This is the yard plan for Brookmere with the names of the tracks labeled.  This view conforms to the physical orientation of the layout with the roundhouse immediately in front of the viewer and East being to the left.  We have chosen to retain the currently modeled numbering of the yard tracks.  Our westward train, No. 93 is arriving on the main track from the left.


According to the KV men, the movements would be as follows (summarized on the Train Card):
  • the caboose goes to the (Princeton sub) Caboose Track - East
  • the 3 reefers and the single box car are headed west and thus they will be going to the passing track which is located on the far side of the main track
  • the "shorts" will be spotted on the Yard Track #3 - or if it is full - Yard #2
  • the Engineman will then take his locomotive to the shop tracks or the roundhouse 
Here is the sequence in photos.
No. 93 is occupying the main track and approaching the station.  Bell will start to ring as it gets closer continuing in all the back and forth movements needed to set out the caboose on the nearby Princeton Caboose track.  Once clear of the station the bell ringing can cease (Rule 30).
 
Cars on the left were set out by an earlier train from Penticton.  They will eventually be combined with our cars for a trip down the Coquihalla to Ruby Creek.  There a mainline crew will take the cars to Port Coquitlam and other points west.

On the right are some tank cars on Yard track #2 awaiting an Eastbound through freight.  Cars on Yard track #3 are "shorts" which will be delivered to various on-line customers to be served by the appropriate wayfreights for the Princeton Sub, Coquihalla sub, and Merritt sub.

All in all, today there are quite a few cars headed west but not too many for the east.


Setting out the caboose.  Note the yellow pin which is not to be found on the prototype.  This pin marks the centre of an uncoupling magnet.  No "picking" necessary.
Real life Conductor "Kettle Valley Gus," who appeared in the last post, advised that the real life operation of setting out the caboose would not involve a backing movement of the train.  Rather, the conductor would pull the pin "on the fly" thereby uncoupling his car from the rest of the train as they approached the station and employing the handbrake to arrest their movement clear of the switch points.  The brakeman would detrain and throw the caboose track switch, after which, the conductor would release the handbrake allowing the caboose to roll on its own into the caboose track where it would be brought to a stop again with the handbrake.  There was a good enough grade east of the station for a car to roll away on its own.  (see grade profile here http://kettlevalleymodelrailway.blogspot.ca/2014/12/brookmere-early-railway-years.html)

No. 93 continues on the main track to the west end of the yard where it will stop to cut off the last two cars of the consist which are destined for the "shorts" track in the yard proper.  The other four westbound cars are now taken forward over the road crossing, bell once again ringing and a 14L being sounded on the engine's whistle (rule 14 L).
The four car cut is  backed into the "passing siding" which is not used at all for passing.  The cut is coupled up to any standing cars already there and brakes applied.  Derail is reset.  There are no model brakes and no model derail installed yet but perhaps one day the latter.
 Engine 3639 cuts off the westbound cars and couples back on to the log flats destined for Thalia.  They are pushed back onto the Yard lead and will be set out onto the Yard Track #3.  Now clear of the road crossing, the bell ringing is finished. 
 Spotting the log flats on Yard Track #3, coupling them onto the other two cars already there.  The pin for the uncoupling magnet is just visible.  As to the use of the yard tracks on the prototype, it seems that cars were actually set out on any track available.  We have had to adopt a standard practice of assigning cars to tracks 2 and 3 due to the "busyness" of the model yard in an operating session.  Realize that we do in four hours what the prototype did in 24. 
Having completed our work, Engine 3639 is parked on the shop track.  This is somewhat preferable to parking in the roundhouse where repairs and servicing were carried out.  The near shop track was normally left vacant for access to the turntable and the cinder-pit seen in the foreground.  On the layout, we have installed an electrical "isolator track and switch" allowing the newly arrived engine a respite from any electricity flowing through its veins.  This mutes the engine's decoder, thereby extending its life.  This view also illustrates that normally, a break was left in the parked railcars both in front and behind the station to permit access by the employees and public.


Now to book off, returning the Car Cards and Waybills to the Agent and advising him of the 2 cars laden with perishables that we have just set out.  Ready for another assignment?

Coquihalla Man